目录
简介
这个例子展示一种矫正传感输入的技巧。这个开发板在启动时让传感器读取5秒钟,记录最高和最低值的轨迹。这些在程序里执行5秒的传感读取数定义为循环下一次读取的期望值的最小值和最大值。
硬件要求
- Arduino 或者 Genuino开发板
- LED
- 模拟感应器 (光敏电阻可以做到)
- 10k Ω 电阻
- 220 Ω 电阻
- 连接线
- 面包板
电路
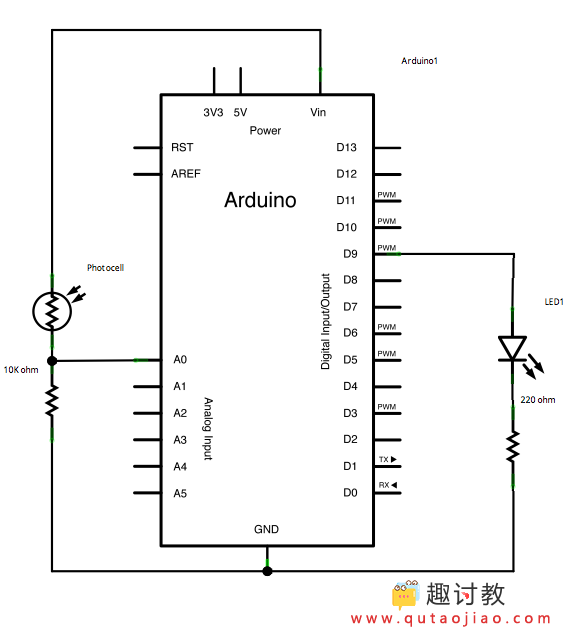
模拟传感器(如电位计,光传感器)在模拟输入A2上。LED在数字引脚pin9上。

把一个LED灯通过220Ω限流电阻连接到数字引脚pin9。把一个光敏电阻的一端连接到5V。另一端连接到pin0,并通过10k Ω电阻下拉到地。
原理图

样例代码
- 在启动函数前,你要为最大值和最小值设置初始值,如:
int sensorMin = 1023;        // minimum sensor value
int sensorMax = 0;           // maximum sensor value
- 这些可能看起来反了。开始时,你设置最大的高电平,然后读取任何比它低的值,将它作为新的最小值保存。同样地,你设置最小的低电平,然后读取任何比它高的值,将它作为新的最大值保存。就像这样:
// calibrate during the first five seconds
 while (millis() < 5000) {
   sensorValue = analogRead(sensorPin);

   // record the maximum sensor value
   if (sensorValue > sensorMax) {
     sensorMax = sensorValue;
   }

   // record the minimum sensor value
   if (sensorValue < sensorMin) {
     sensorMin = sensorValue;
   }
 }

这种方式下,你做的更多读取可能会根据这个最大值和最小值按比例分配。就像这样:
// apply the calibration to the sensor reading
sensorValue = map(sensorValue, sensorMin, sensorMax, 0, 255);
- 这里有全部程序:
// These constants won't change:
const int sensorPin = A0;    // pin that the sensor is attached to
const int ledPin = 9;        // pin that the LED is attached to

// variables:
int sensorValue = 0;         // the sensor value
int sensorMin = 1023;        // minimum sensor value
int sensorMax = 0;           // maximum sensor value


void setup() {
  // turn on LED to signal the start of the calibration period:
  pinMode(13, OUTPUT);
  digitalWrite(13, HIGH);

  // calibrate during the first five seconds
  while (millis() < 5000) {
    sensorValue = analogRead(sensorPin);

    // record the maximum sensor value
    if (sensorValue > sensorMax) {
      sensorMax = sensorValue;
    }

    // record the minimum sensor value
    if (sensorValue < sensorMin) {
      sensorMin = sensorValue;
    }
  }

  // signal the end of the calibration period
  digitalWrite(13, LOW);
}

void loop() {
  // read the sensor:
  sensorValue = analogRead(sensorPin);

  // apply the calibration to the sensor reading
  sensorValue = map(sensorValue, sensorMin, sensorMax, 0, 255);

  // in case the sensor value is outside the range seen during calibration
  sensorValue = constrain(sensorValue, 0, 255);

  // fade the LED using the calibrated value:
  analogWrite(ledPin, sensorValue);
}


支持