本文的目的是解释如何使用ESP32和Arduino IDE库连接到MQTT代理并订阅主题。
目录
介绍
本文的目的是解释如何使用ESP32和Arduino IDE库连接到MQTT代理并订阅主题。
我们假设代理将托管在CloudMQTT上。我们还将使用名为PubSubClient的MQTT库,它将公开连接到代理和以及订阅主题所需的功能。
代码
首先,我们需要下载所有所需的库。我们需要WiFi库,以便能够将ESP32连接到WiFi网络,以及PubSubClient库,它将提供与MQTT相关的功能。
之后,我们声明一些全局变量来保存连接的凭据。我们需要WiFi凭证才能连接到WiFi网络。我们还需要MQTT服务器的信息和凭据。我们需要服务器地址,端口,用户名和密码,可以在CloudMQTT的实例信息页面中获取。
然后,我们将声明一个WiFiClient类的对象,这将允许我们创建到某个IP和端口的连接。我们还将声明类PubSubClient的对象,该对象接收构造函数的输入以前定义的WiFiClient对象:
#include <WiFi.h>
#include <PubSubClient.h>

const char* ssid = "yourNetworkName";
const char* password = "yourNetworkPassword";
const char* mqttServer = "m11.cloudmqtt.com";
const int mqttPort = 12948;
const char* mqttUser = "yourMQTTuser";
const char* mqttPassword = "yourMQTTpassword";

WiFiClient espClient;
PubSubClient client(espClient);
现在,在setup函数中,我们将通过串口监视器,输出程序的结果。我们还将建立与WiFi网络的连接。
接下来,我们需要指定MQTT服务器的地址和端口。为此,我们 在PubSubClient对象上调用setServer方法。此方法将接收地址和第二个端口作为第一个参数,两者都在全局变量的早期定义。
然后,我们在同一个对象上使用setCallback方法来指定处理函数。当在订阅主题上收到MQTT消息时,将执行此处理函数:
Serial.begin(115200);

WiFi.begin(ssid, password);

while (WiFi.status() != WL_CONNECTED) {
    delay(500);
    Serial.println("Connecting to WiFi..");
}
Serial.println("Connected to the WiFi network");

client.setServer(mqttServer, mqttPort);
client.setCallback(callback);
接下来,我们将连接到MQTT服务器。我们将在循环中完成它,直到我们获得成功:
hile (!client.connected()) {
    Serial.println("Connecting to MQTT...");

    if (client.connect("ESP32Client", mqttUser, mqttPassword )) {

      Serial.println("connected");

    } else {

      Serial.print("failed with state ");
      Serial.print(client.state());
      delay(2000);

    }
}
最后,我们将订阅我们想要的主题。这样,我们将从其他客户端接收关于该主题发布的消息。为此,我们调用subscribe方法,该方法接收我们想要订阅的主题的名称作为输入。本教程的主题是“esp / test”:
client.subscribe("esp/test");
回调函数
如之前所述,我们仍然需要指定回调函数,以便在收到订阅主题的消息时执行。此回调函数的参数是主题的名称,有效负载(以字节为单位)和收到的消息的长度。该消息也应该返回void。
从下面的代码中可以看出,我们将首先打印主题名称,然后打印收到的消息的每个字节。最后,我们还将打印一些分隔符,以区分收到的消息:
void callback(char* topic, byte* payload, unsigned int length) {

  Serial.print("Message arrived in topic: ");
  Serial.println(topic);

  Serial.print("Message:");
  for (int i = 0; i < length; i++) {
    Serial.print((char)payload[i]);
  }

  Serial.println();
  Serial.println("-----------------------");

}
主循环
在主循环函数中,我们需要调用PubSubClient 的循环方法。如库的文档中所示,应定期调用该函数,以便允许客户端处理传入消息并维护与MQTT服务器的连接:
void loop() {
  client.loop();
}
下面是完整代码:
#include <WiFi.h>
#include <PubSubClient.h>

const char* ssid = "yourNetworkName";
const char* password =  "yourNetworkPassword";
const char* mqttServer = "m11.cloudmqtt.com";
const int mqttPort = 12948;
const char* mqttUser = "yourMQTTuser";
const char* mqttPassword = "yourMQTTpassword";

WiFiClient espClient;
PubSubClient client(espClient);

void callback(char* topic, byte* payload, unsigned int length) {

  Serial.print("Message arrived in topic: ");
  Serial.println(topic);

  Serial.print("Message:");
  for (int i = 0; i < length; i++) {
    Serial.print((char)payload[i]);
  }

  Serial.println();
  Serial.println("-----------------------");

}

void setup() {

  Serial.begin(115200);

  WiFi.begin(ssid, password);

  while (WiFi.status() != WL_CONNECTED) {
    delay(500);
    Serial.println("Connecting to WiFi..");
  }
  Serial.println("Connected to the WiFi network");

  client.setServer(mqttServer, mqttPort);
  client.setCallback(callback);

  while (!client.connected()) {
    Serial.println("Connecting to MQTT...");

    if (client.connect("ESP32Client", mqttUser, mqttPassword )) {

      Serial.println("connected");

    } else {

      Serial.print("failed with state ");
      Serial.print(client.state());
      delay(2000);

    }
  }

  client.subscribe("esp/test");

}

void loop() {
  client.loop();
}
测试代码
要测试代码,只需将其上传到ESP32并打开Arduino IDE串行监视器。
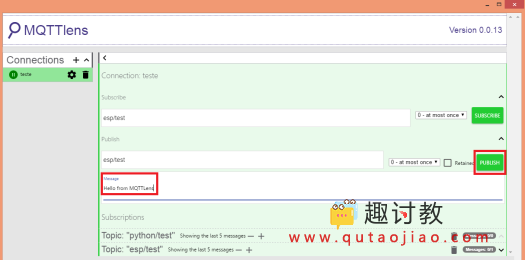
像上一个教程一样,我们也将使用MQTTLens软件进行测试。因此,我们只需打开它并向ESP32订阅的帖子发布消息,如图1所示。

图1 – 从MQTTLens向MQTT主题发送消息。
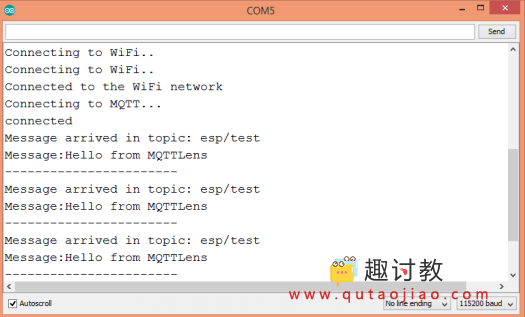
在Arduino IDE串行监视器中,我们应该得到类似于图2的结果,其中打印先前发送给主题的消息。在这种情况下,我发送了几个。

图2 – 从订阅的MQTT主题获取消息。


