在这个项目中,我们将 ESP32-CAM 连接到带有两个 SG90 伺服电机(舵机)的平移(旋转)和倾斜(上下移动)支架上。使用平移和倾斜摄像机支架,您可以向上、向下、向左和向右移动摄像机——这非常适合监控。ESP32-CAM 搭建网络服务器,显示视频流和按钮来控制伺服电机移动相机。
本文中,伺服电机,指的是平时我们讲的舵机。
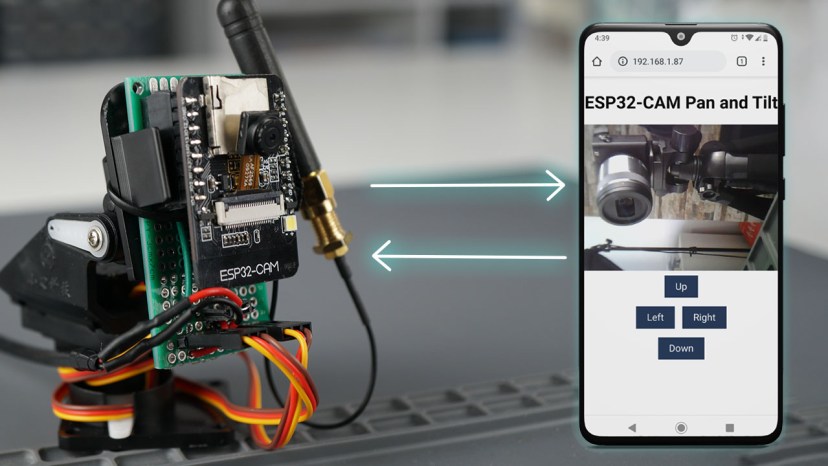
开发板兼容性:对于这个项目,您需要一个 ESP32 相机开发板,
所需零件
对于这个项目,我们将使用以下部分:
- ESP32-CAM AI-Thinker
- 带有 SG90 伺服电机的平移和倾斜支架
- 洞洞板,可以焊接的那种(可选)
- 连接线
平移和倾斜支架已经舵机
对于这个项目,我们将使用一个已经配备两个 SG90 伺服电机的平移和倾斜支架。支架如下图所示。
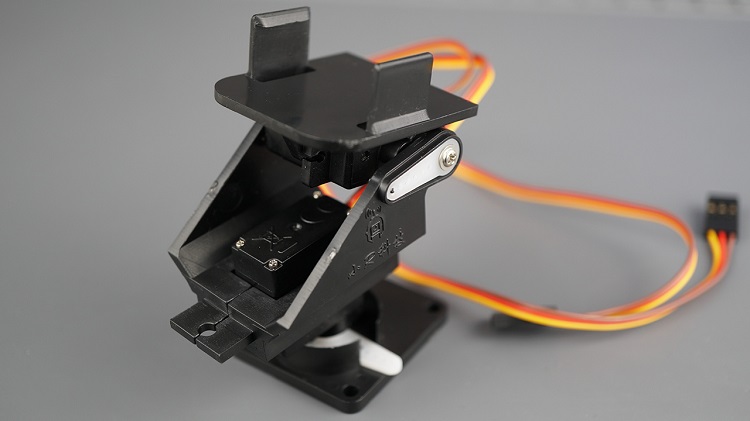
伺服电机有三根不同颜色的电线:
| 连接线 | 颜色 |
| VCC | 红色的 |
| GND | 黑色或棕色 |
| 信号线 | 黄色、橙色或白色 |
如何控制伺服?
您可以将伺服轴定位在 0 到 180º 的各种角度。伺服系统使用脉宽调制 (PWM) 信号进行控制。这意味着发送到电机的 PWM 信号决定了轴的位置。
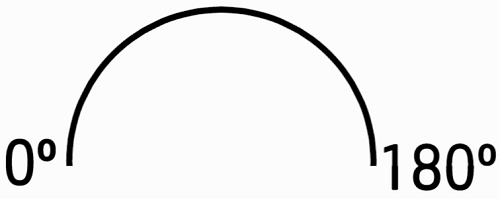
要控制伺服电机,您可以通过发送具有适当脉冲宽度的信号来使用 ESP32 的 PWM 功能。或者您可以使用库来简化代码。我们将使用ESP32Servo库。
安装 ESP32Servo 库
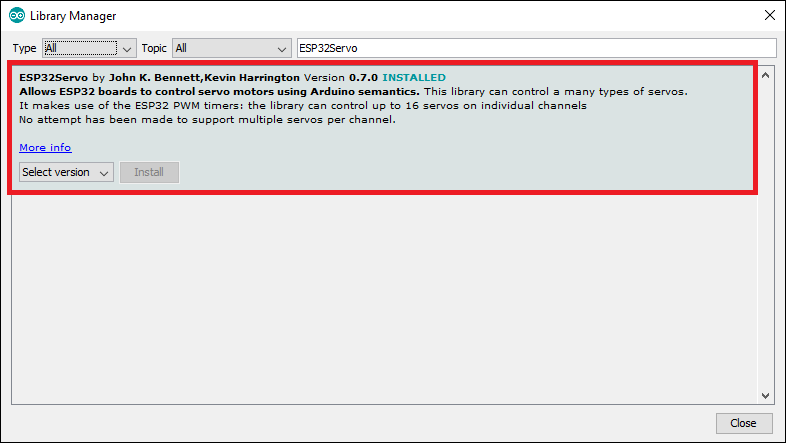
为了控制伺服电机,我们将使用ESP32Servo库。确保在继续之前安装该库。在您的 Arduino IDE 中,转到Sketch > Include Library > Manage Libraries。搜索ESP32Servo并安装库,如下所示。
代码
将以下代码复制到您的 Arduino IDE。
/*********

  Permission is hereby granted, free of charge, to any person obtaining a copy of this software and associated documentation files.
  The above copyright notice and this permission notice shall be included in all copies or substantial portions of the Software.
*********/

#include "esp_camera.h"
#include <WiFi.h>
#include "esp_timer.h"
#include "img_converters.h"
#include "Arduino.h"
#include "fb_gfx.h"
#include "soc/soc.h"             // disable brownout problems
#include "soc/rtc_cntl_reg.h"    // disable brownout problems
#include "esp_http_server.h"
#include <ESP32Servo.h>

// Replace with your network credentials
const char* ssid = "REPLACE_WITH_YOUR_SSID";
const char* password = "REPLACE_WITH_YOUR_PASSWORD";

#define PART_BOUNDARY "123456789000000000000987654321"

#define CAMERA_MODEL_AI_THINKER
//#define CAMERA_MODEL_M5STACK_PSRAM
//#define CAMERA_MODEL_M5STACK_WITHOUT_PSRAM
//#define CAMERA_MODEL_M5STACK_PSRAM_B
//#define CAMERA_MODEL_WROVER_KIT

#if defined(CAMERA_MODEL_WROVER_KIT)
  #define PWDN_GPIO_NUM    -1
  #define RESET_GPIO_NUM   -1
  #define XCLK_GPIO_NUM    21
  #define SIOD_GPIO_NUM    26
  #define SIOC_GPIO_NUM    27

  #define Y9_GPIO_NUM      35
  #define Y8_GPIO_NUM      34
  #define Y7_GPIO_NUM      39
  #define Y6_GPIO_NUM      36
  #define Y5_GPIO_NUM      19
  #define Y4_GPIO_NUM      18
  #define Y3_GPIO_NUM       5
  #define Y2_GPIO_NUM       4
  #define VSYNC_GPIO_NUM   25
  #define HREF_GPIO_NUM    23
  #define PCLK_GPIO_NUM    22

#elif defined(CAMERA_MODEL_M5STACK_PSRAM)
  #define PWDN_GPIO_NUM     -1
  #define RESET_GPIO_NUM    15
  #define XCLK_GPIO_NUM     27
  #define SIOD_GPIO_NUM     25
  #define SIOC_GPIO_NUM     23

  #define Y9_GPIO_NUM       19
  #define Y8_GPIO_NUM       36
  #define Y7_GPIO_NUM       18
  #define Y6_GPIO_NUM       39
  #define Y5_GPIO_NUM        5
  #define Y4_GPIO_NUM       34
  #define Y3_GPIO_NUM       35
  #define Y2_GPIO_NUM       32
  #define VSYNC_GPIO_NUM    22
  #define HREF_GPIO_NUM     26
  #define PCLK_GPIO_NUM     21

#elif defined(CAMERA_MODEL_M5STACK_WITHOUT_PSRAM)
  #define PWDN_GPIO_NUM     -1
  #define RESET_GPIO_NUM    15
  #define XCLK_GPIO_NUM     27
  #define SIOD_GPIO_NUM     25
  #define SIOC_GPIO_NUM     23

  #define Y9_GPIO_NUM       19
  #define Y8_GPIO_NUM       36
  #define Y7_GPIO_NUM       18
  #define Y6_GPIO_NUM       39
  #define Y5_GPIO_NUM        5
  #define Y4_GPIO_NUM       34
  #define Y3_GPIO_NUM       35
  #define Y2_GPIO_NUM       17
  #define VSYNC_GPIO_NUM    22
  #define HREF_GPIO_NUM     26
  #define PCLK_GPIO_NUM     21

#elif defined(CAMERA_MODEL_AI_THINKER)
  #define PWDN_GPIO_NUM     32
  #define RESET_GPIO_NUM    -1
  #define XCLK_GPIO_NUM      0
  #define SIOD_GPIO_NUM     26
  #define SIOC_GPIO_NUM     27

  #define Y9_GPIO_NUM       35
  #define Y8_GPIO_NUM       34
  #define Y7_GPIO_NUM       39
  #define Y6_GPIO_NUM       36
  #define Y5_GPIO_NUM       21
  #define Y4_GPIO_NUM       19
  #define Y3_GPIO_NUM       18
  #define Y2_GPIO_NUM        5
  #define VSYNC_GPIO_NUM    25
  #define HREF_GPIO_NUM     23
  #define PCLK_GPIO_NUM     22

#elif defined(CAMERA_MODEL_M5STACK_PSRAM_B)
  #define PWDN_GPIO_NUM     -1
  #define RESET_GPIO_NUM    15
  #define XCLK_GPIO_NUM     27
  #define SIOD_GPIO_NUM     22
  #define SIOC_GPIO_NUM     23

  #define Y9_GPIO_NUM       19
  #define Y8_GPIO_NUM       36
  #define Y7_GPIO_NUM       18
  #define Y6_GPIO_NUM       39
  #define Y5_GPIO_NUM        5
  #define Y4_GPIO_NUM       34
  #define Y3_GPIO_NUM       35
  #define Y2_GPIO_NUM       32
  #define VSYNC_GPIO_NUM    25
  #define HREF_GPIO_NUM     26
  #define PCLK_GPIO_NUM     21

#else
  #error "Camera model not selected"
#endif

#define SERVO_1      14
#define SERVO_2      15

#define SERVO_STEP   5

Servo servoN1;
Servo servoN2;
Servo servo1;
Servo servo2;

int servo1Pos = 0;
int servo2Pos = 0;

static const char* _STREAM_CONTENT_TYPE = "multipart/x-mixed-replace;boundary=" PART_BOUNDARY;
static const char* _STREAM_BOUNDARY = "rn--" PART_BOUNDARY "rn";
static const char* _STREAM_PART = "Content-Type: image/jpegrnContent-Length: %urnrn";

httpd_handle_t camera_httpd = NULL;
httpd_handle_t stream_httpd = NULL;

static const char PROGMEM INDEX_HTML[] = R"rawliteral(
<html>
  <head>
    <title>ESP32-CAM Robot</title>
    <meta name="viewport" content="width=device-width, initial-scale=1">
    <style>
      body { font-family: Arial; text-align: center; margin:0px auto; padding-top: 30px;}
      table { margin-left: auto; margin-right: auto; }
      td { padding: 8 px; }
      .button {
        background-color: #2f4468;
        border: none;
        color: white;
        padding: 10px 20px;
        text-align: center;
        text-decoration: none;
        display: inline-block;
        font-size: 18px;
        margin: 6px 3px;
        cursor: pointer;
        -webkit-touch-callout: none;
        -webkit-user-select: none;
        -khtml-user-select: none;
        -moz-user-select: none;
        -ms-user-select: none;
        user-select: none;
        -webkit-tap-highlight-color: rgba(0,0,0,0);
      }
      img {  width: auto ;
        max-width: 100% ;
        height: auto ;
      }
    </style>
  </head>
  <body>
    <h1>ESP32-CAM Pan and Tilt</h1>
    <img src="" id="photo" >
    <table>
      <tr><td colspan="3" align="center"><button class="button" onmousedown="toggleCheckbox('up');" ontouchstart="toggleCheckbox('up');">Up</button></td></tr>
      <tr><td align="center"><button class="button" onmousedown="toggleCheckbox('left');" ontouchstart="toggleCheckbox('left');">Left</button></td><td align="center"></td><td align="center"><button class="button" onmousedown="toggleCheckbox('right');" ontouchstart="toggleCheckbox('right');">Right</button></td></tr>
      <tr><td colspan="3" align="center"><button class="button" onmousedown="toggleCheckbox('down');" ontouchstart="toggleCheckbox('down');">Down</button></td></tr>
    </table>
   <script>
   function toggleCheckbox(x) {
     var xhr = new XMLHttpRequest();
     xhr.open("GET", "/action?go=" + x, true);
     xhr.send();
   }
   window.onload = document.getElementById("photo").src = window.location.href.slice(0, -1) + ":81/stream";
  </script>
  </body>
</html>
)rawliteral";

static esp_err_t index_handler(httpd_req_t *req){
  httpd_resp_set_type(req, "text/html");
  return httpd_resp_send(req, (const char *)INDEX_HTML, strlen(INDEX_HTML));
}

static esp_err_t stream_handler(httpd_req_t *req){
  camera_fb_t * fb = NULL;
  esp_err_t res = ESP_OK;
  size_t _jpg_buf_len = 0;
  uint8_t * _jpg_buf = NULL;
  char * part_buf[64];

  res = httpd_resp_set_type(req, _STREAM_CONTENT_TYPE);
  if(res != ESP_OK){
    return res;
  }

  while(true){
    fb = esp_camera_fb_get();
    if (!fb) {
      Serial.println("Camera capture failed");
      res = ESP_FAIL;
    } else {
      if(fb->width > 400){
        if(fb->format != PIXFORMAT_JPEG){
          bool jpeg_converted = frame2jpg(fb, 80, &_jpg_buf, &_jpg_buf_len);
          esp_camera_fb_return(fb);
          fb = NULL;
          if(!jpeg_converted){
            Serial.println("JPEG compression failed");
            res = ESP_FAIL;
          }
        } else {
          _jpg_buf_len = fb->len;
          _jpg_buf = fb->buf;
        }
      }
    }
    if(res == ESP_OK){
      size_t hlen = snprintf((char *)part_buf, 64, _STREAM_PART, _jpg_buf_len);
      res = httpd_resp_send_chunk(req, (const char *)part_buf, hlen);
    }
    if(res == ESP_OK){
      res = httpd_resp_send_chunk(req, (const char *)_jpg_buf, _jpg_buf_len);
    }
    if(res == ESP_OK){
      res = httpd_resp_send_chunk(req, _STREAM_BOUNDARY, strlen(_STREAM_BOUNDARY));
    }
    if(fb){
      esp_camera_fb_return(fb);
      fb = NULL;
      _jpg_buf = NULL;
    } else if(_jpg_buf){
      free(_jpg_buf);
      _jpg_buf = NULL;
    }
    if(res != ESP_OK){
      break;
    }
    //Serial.printf("MJPG: %uBn",(uint32_t)(_jpg_buf_len));
  }
  return res;
}

static esp_err_t cmd_handler(httpd_req_t *req){
  char*  buf;
  size_t buf_len;
  char variable[32] = {0,};

  buf_len = httpd_req_get_url_query_len(req) + 1;
  if (buf_len > 1) {
    buf = (char*)malloc(buf_len);
    if(!buf){
      httpd_resp_send_500(req);
      return ESP_FAIL;
    }
    if (httpd_req_get_url_query_str(req, buf, buf_len) == ESP_OK) {
      if (httpd_query_key_value(buf, "go", variable, sizeof(variable)) == ESP_OK) {
      } else {
        free(buf);
        httpd_resp_send_404(req);
        return ESP_FAIL;
      }
    } else {
      free(buf);
      httpd_resp_send_404(req);
      return ESP_FAIL;
    }
    free(buf);
  } else {
    httpd_resp_send_404(req);
    return ESP_FAIL;
  }

  sensor_t * s = esp_camera_sensor_get();
  //flip the camera vertically
  //s->set_vflip(s, 1);          // 0 = disable , 1 = enable
  // mirror effect
  //s->set_hmirror(s, 1);          // 0 = disable , 1 = enable

  int res = 0;

  if(!strcmp(variable, "up")) {
    if(servo1Pos <= 170) {
      servo1Pos += 10;
      servo1.write(servo1Pos);
    }
    Serial.println(servo1Pos);
    Serial.println("Up");
  }
  else if(!strcmp(variable, "left")) {
    if(servo2Pos <= 170) {
      servo2Pos += 10;
      servo2.write(servo2Pos);
    }
    Serial.println(servo2Pos);
    Serial.println("Left");
  }
  else if(!strcmp(variable, "right")) {
    if(servo2Pos >= 10) {
      servo2Pos -= 10;
      servo2.write(servo2Pos);
    }
    Serial.println(servo2Pos);
    Serial.println("Right");
  }
  else if(!strcmp(variable, "down")) {
    if(servo1Pos >= 10) {
      servo1Pos -= 10;
      servo1.write(servo1Pos);
    }
    Serial.println(servo1Pos);
    Serial.println("Down");
  }
  else {
    res = -1;
  }

  if(res){
    return httpd_resp_send_500(req);
  }

  httpd_resp_set_hdr(req, "Access-Control-Allow-Origin", "*");
  return httpd_resp_send(req, NULL, 0);
}

void startCameraServer(){
  httpd_config_t config = HTTPD_DEFAULT_CONFIG();
  config.server_port = 80;
  httpd_uri_t index_uri = {
    .uri       = "/",
    .method    = HTTP_GET,
    .handler   = index_handler,
    .user_ctx  = NULL
  };

  httpd_uri_t cmd_uri = {
    .uri       = "/action",
    .method    = HTTP_GET,
    .handler   = cmd_handler,
    .user_ctx  = NULL
  };
  httpd_uri_t stream_uri = {
    .uri       = "/stream",
    .method    = HTTP_GET,
    .handler   = stream_handler,
    .user_ctx  = NULL
  };
  if (httpd_start(&camera_httpd, &config) == ESP_OK) {
    httpd_register_uri_handler(camera_httpd, &index_uri);
    httpd_register_uri_handler(camera_httpd, &cmd_uri);
  }
  config.server_port += 1;
  config.ctrl_port += 1;
  if (httpd_start(&stream_httpd, &config) == ESP_OK) {
    httpd_register_uri_handler(stream_httpd, &stream_uri);
  }
}

void setup() {
  WRITE_PERI_REG(RTC_CNTL_BROWN_OUT_REG, 0); //disable brownout detector
  servo1.setPeriodHertz(50);    // standard 50 hz servo
  servo2.setPeriodHertz(50);    // standard 50 hz servo
  servoN1.attach(2, 1000, 2000);
  servoN2.attach(13, 1000, 2000);

  servo1.attach(SERVO_1, 1000, 2000);
  servo2.attach(SERVO_2, 1000, 2000);

  servo1.write(servo1Pos);
  servo2.write(servo2Pos);

  Serial.begin(115200);
  Serial.setDebugOutput(false);

  camera_config_t config;
  config.ledc_channel = LEDC_CHANNEL_0;
  config.ledc_timer = LEDC_TIMER_0;
  config.pin_d0 = Y2_GPIO_NUM;
  config.pin_d1 = Y3_GPIO_NUM;
  config.pin_d2 = Y4_GPIO_NUM;
  config.pin_d3 = Y5_GPIO_NUM;
  config.pin_d4 = Y6_GPIO_NUM;
  config.pin_d5 = Y7_GPIO_NUM;
  config.pin_d6 = Y8_GPIO_NUM;
  config.pin_d7 = Y9_GPIO_NUM;
  config.pin_xclk = XCLK_GPIO_NUM;
  config.pin_pclk = PCLK_GPIO_NUM;
  config.pin_vsync = VSYNC_GPIO_NUM;
  config.pin_href = HREF_GPIO_NUM;
  config.pin_sscb_sda = SIOD_GPIO_NUM;
  config.pin_sscb_scl = SIOC_GPIO_NUM;
  config.pin_pwdn = PWDN_GPIO_NUM;
  config.pin_reset = RESET_GPIO_NUM;
  config.xclk_freq_hz = 20000000;
  config.pixel_format = PIXFORMAT_JPEG;

  if(psramFound()){
    config.frame_size = FRAMESIZE_VGA;
    config.jpeg_quality = 10;
    config.fb_count = 2;
  } else {
    config.frame_size = FRAMESIZE_SVGA;
    config.jpeg_quality = 12;
    config.fb_count = 1;
  }

  // Camera init
  esp_err_t err = esp_camera_init(&config);
  if (err != ESP_OK) {
    Serial.printf("Camera init failed with error 0x%x", err);
    return;
  }
  // Wi-Fi connection
  WiFi.begin(ssid, password);
  while (WiFi.status() != WL_CONNECTED) {
    delay(500);
    Serial.print(".");
  }
  Serial.println("");
  Serial.println("WiFi connected");

  Serial.print("Camera Stream Ready! Go to: http://");
  Serial.println(WiFi.localIP());

  // Start streaming web server
  startCameraServer();
}

void loop() {

}
网络凭据
插入您的网络凭据,代码应该会立即生效。
const char* ssid = "REPLACE_WITH_YOUR_SSID";
const char* password = "REPLACE_WITH_YOUR_PASSWORD";
代码的工作原理
下面我们来看看控制伺服电机的相关部分。
定义伺服电机所连接的引脚。在这种情况下,它们连接到 ESP32-CAM GPIO 14 和 15。
#define SERVO_1 14
#define SERVO_2 15
创造 伺服 控制每个电机的对象:
Servo servoN1;
Servo servoN2;
Servo servo1;
Servo servo2;
你可能想知道为什么我们要创建四个 伺服当我们只有两个伺服系统时。发生的事情是我们使用的伺服库自动为每个伺服电机分配一个 PWM 通道(servoN1 → PWM 通道 0;servoN2 → PWM 通道 1;servo1 → PWM 通道 2;伺服 2 → PWM 通道 3)。
相机正在使用第一个通道,因此如果我们更改这些 PWM 通道的属性,相机将出现错误。所以,我们会控制伺服1 和 伺服2 使用相机未使用的 PWM 通道 2 和 3。
定义舵机初始位置。
int servo1Pos = 0;
int servo2Pos = 0;
网页
这 INDEX_HTML变量包含用于构建网页的 HTML 文本。以下几行显示按钮。
<table>
  <tr><td colspan="3" align="center"><button class="button" onmousedown="toggleCheckbox('up');" ontouchstart="toggleCheckbox('up');">Up</button></td></tr>
  <tr><td align="center"><button class="button" onmousedown="toggleCheckbox('left');" ontouchstart="toggleCheckbox('left');">Left</button></td><td align="center"></td><td align="center"><button class="button" onmousedown="toggleCheckbox('right');" ontouchstart="toggleCheckbox('right');">Right</button></td></tr>
  <tr><td colspan="3" align="center"><button class="button" onmousedown="toggleCheckbox('down');" ontouchstart="toggleCheckbox('down');">Down</button></td></tr>
</table>
当您单击按钮时, 切换复选框() 调用 JavaScript 函数。它根据单击的按钮对不同的 URL 发出请求。
function toggleCheckbox(x) {
  var xhr = new XMLHttpRequest();
  xhr.open("GET", "/action?go=" + x, true);
  xhr.send();
}
以下是根据按下的按钮发出的请求:
向上:
/action?go=up向下:
/action?go=down左转:
/action?go=left右转:
/action?go=right处理请求
然后,我们需要处理当我们收到这些请求时会发生什么。这就是在以下几行中所做的。
if(!strcmp(variable, "up")) {
  if(servo1Pos <= 170) {
    servo1Pos += 10;
    servo1.write(servo1Pos);
  }
  Serial.println(servo1Pos);
  Serial.println("Up");
}
else if(!strcmp(variable, "left")) {
  if(servo2Pos <= 170) {
    servo2Pos += 10;
    servo2.write(servo2Pos);
  }
  Serial.println(servo2Pos);
  Serial.println("Left");
}
else if(!strcmp(variable, "right")) {
  if(servo2Pos >= 10) {
    servo2Pos -= 10;
    servo2.write(servo2Pos);
  }
  Serial.println(servo2Pos);
  Serial.println("Right");
}
else if(!strcmp(variable, "down")) {
  if(servo1Pos >= 10) {
    servo1Pos -= 10;
    servo1.write(servo1Pos);
  }
  Serial.println(servo1Pos);
  Serial.println("Down");
}
要移动电机,请致电 write() 功能在 伺服1 或者 伺服2对象并将角度(0 到 180)作为参数传递。例如:
servo1.write(servo1Pos);setup()
在里面 setup() ,设置伺服电机属性:定义信号频率。
servo1.setPeriodHertz(50); // standard 50 hz servo
servo2.setPeriodHertz(50); // standard 50 hz servo
使用 attach() 以微秒为单位设置伺服GPIO以及最小和最大脉冲宽度的方法:
servo1.attach(SERVO_1, 1000, 2000);
servo2.attach(SERVO_2, 1000, 2000);
当 ESP32 首次启动时,将电机设置到初始位置:
servo1.write(servo1Pos);
servo2.write(servo2Pos);
当涉及到控制伺服电机时,这几乎就是代码的工作方式。
测试代码
插入网络凭据后,您可以将代码上传到您的开发板。
上传后,打开串口监视器获取板子IP地址:
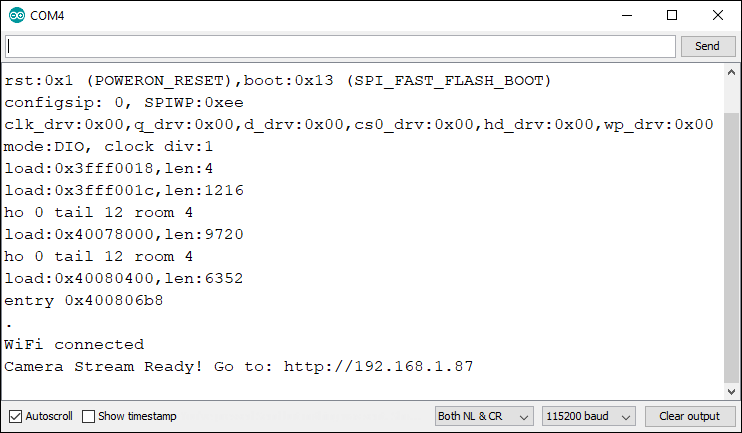
注意:如果您使用的是 FTDI 编程器,请不要忘记在打开串行监视器之前断开 GPIO 0 与 GND 的连接。
打开浏览器并输入开发板 IP 地址以访问 Web 服务器。单击按钮并检查串行监视器是否一切都按预期工作。
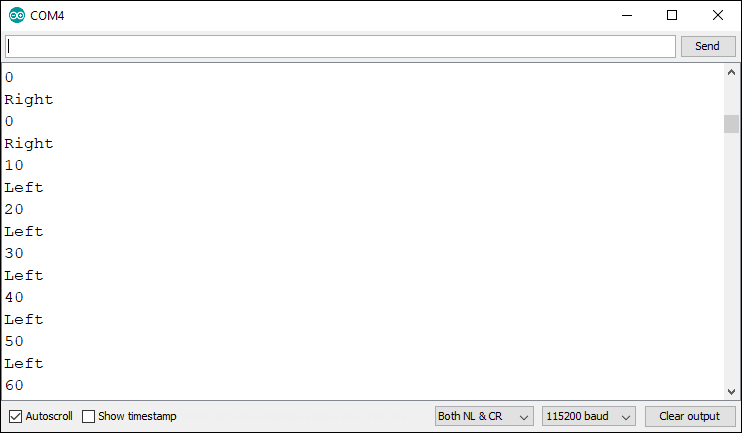
如果一切正常,您可以将伺服电机连接到 ESP32-CAM 并继续该项目。
电路
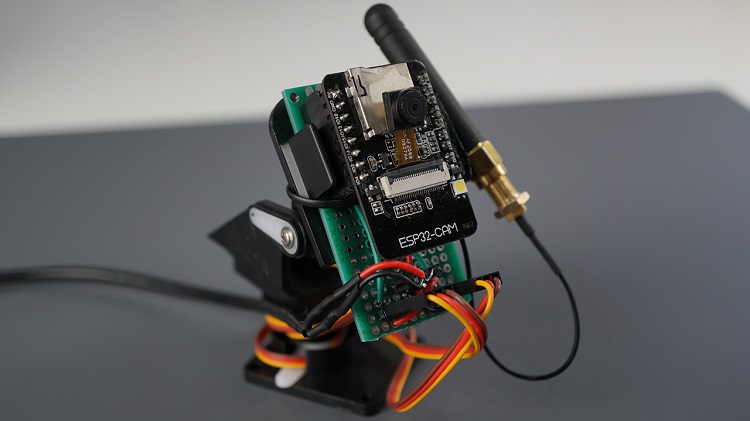
云台支架组装完成后,将伺服电机连接到ESP32-CAM,如下图所示。我们将伺服电机数据引脚连接到通用输入输出口 15 和 通用输入输出口 14.
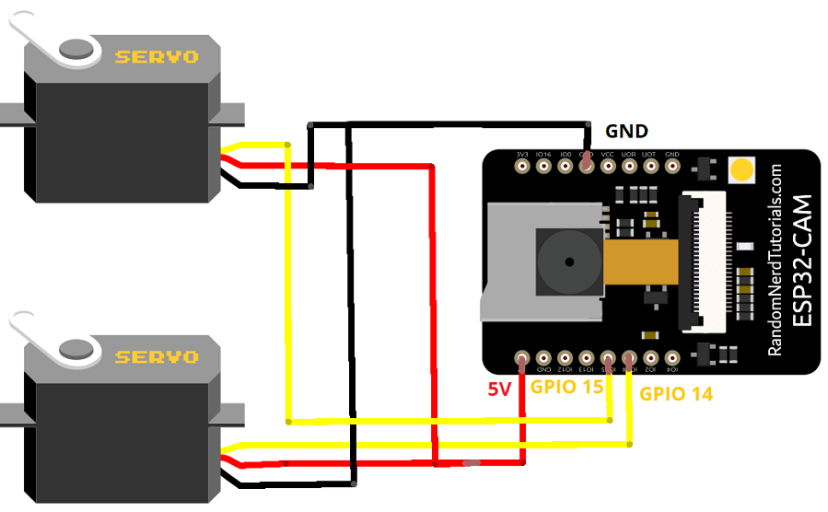
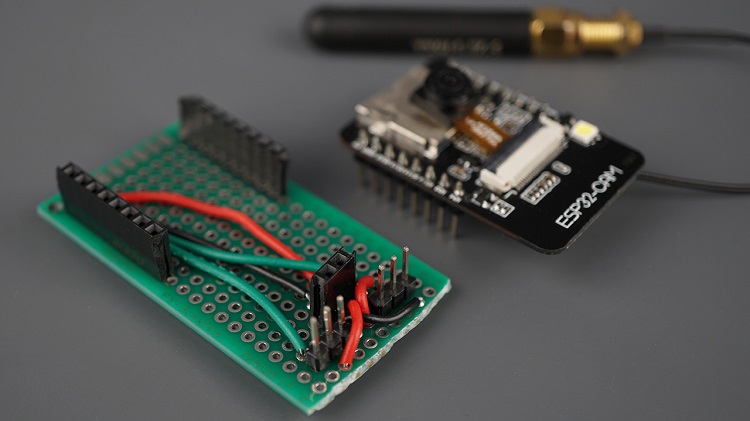
您可以使用迷你面包板组装电路或构建带有插头引脚的迷你带状板来连接电源、ESP32-CAM 和电机,如下所示。
下图显示了云台支架组装后的样子。
示范
为您的电路板通电。打开浏览器并输入 ESP32-CAM IP 地址。应加载具有实时视频流的网页。单击按钮可向上、向下、向左或向右移动相机。
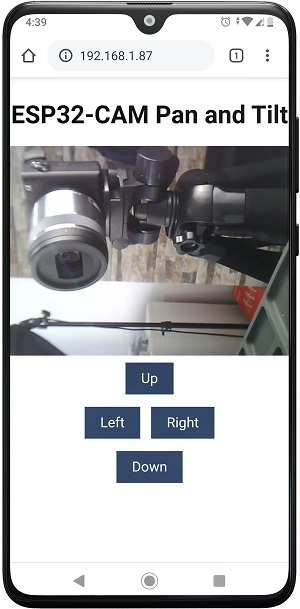
您可以使用网页上的按钮远程移动摄像机。这允许您
根据摄像机位置监控不同的区域。这是监控应用的绝佳解决方案。
总结
在本教程中,学习了如何使用ESP32-CAM视频流构建平移和倾斜网络监控服务器。

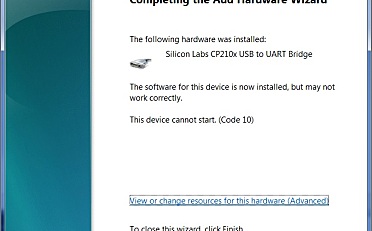


使用了您的代码,按钮什么的都正常显示也可以按,就是图像不出来,这是为什么呢。
我也是这样的情况,你解决了吗?
static const char* _STREAM_CONTENT_TYPE = “multipart/x-mixed-replace;boundary=” PART_BOUNDARY;
static const char* _STREAM_BOUNDARY = “rn–” PART_BOUNDARY “rn”;
static const char* _STREAM_PART = “Content-Type: image/jpegrnContent-Length: %urnrn”;
图像显示不出来是这里面出问题了
视频加载不了是怎么回事
https://randomnerdtutorials.com/esp32-cam-pan-and-tilt-2-axis/
这里的代码有问题, 可能是由于转载所致。正确的代码可以访问这个
https://randomnerdtutorials.com/esp32-cam-pan-and-tilt-2-axis/
为什么舵机不转,图像按钮都能正常显示。
舵机试了好几个都不行
舵机好难
头字段太长如何解决?
问题解决:
// ESP32PWM::allocateTimer(0);
// ESP32PWM::allocateTimer(1); // 上面这两个定时器是摄像头和SD卡在用的,应该是系统的库自动分配了,如果没给伺服对象分配新的定时器的话会导致摄像头和SD卡模块无法工作
ESP32PWM::allocateTimer(2); // 给伺服对象分配定时器
ESP32PWM::allocateTimer(3);
还要记得把伺服引脚设置为输出,不然可能会没有反应 pinMode(SERVO_1, OUTPUT);
OV2640图像质量不行,换镜头不知道有没有改善效果