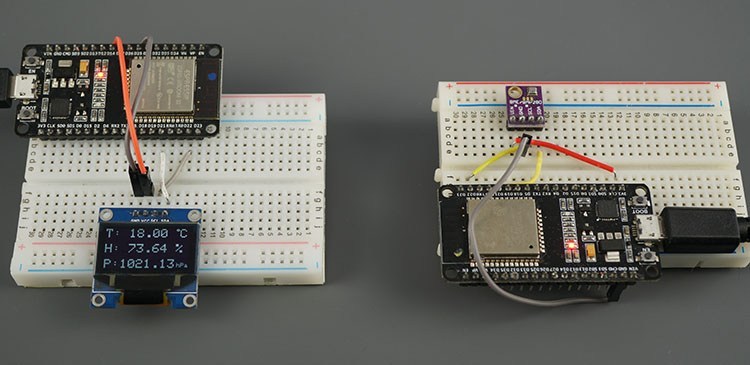
本篇教程将给大家讲解如何在两个ESP32板之间进行HTTP通信,以通过Wi-Fi在不连接互联网(路由器)的情况下交换数据。简而言之,您将学习如何使用HTTP请求将数据从一个板发送到另一个板。ESP32开发板将使用Arduino IDE进行编程。
出于演示目的,我们将BME280传感器的读数从一块板发送到另一块板。接收器将在OLED显示屏上显示读数。
目录
项目概况
一个ESP32板将充当服务器,另一个ESP32板将充当客户端。下图概述了所有工作原理:
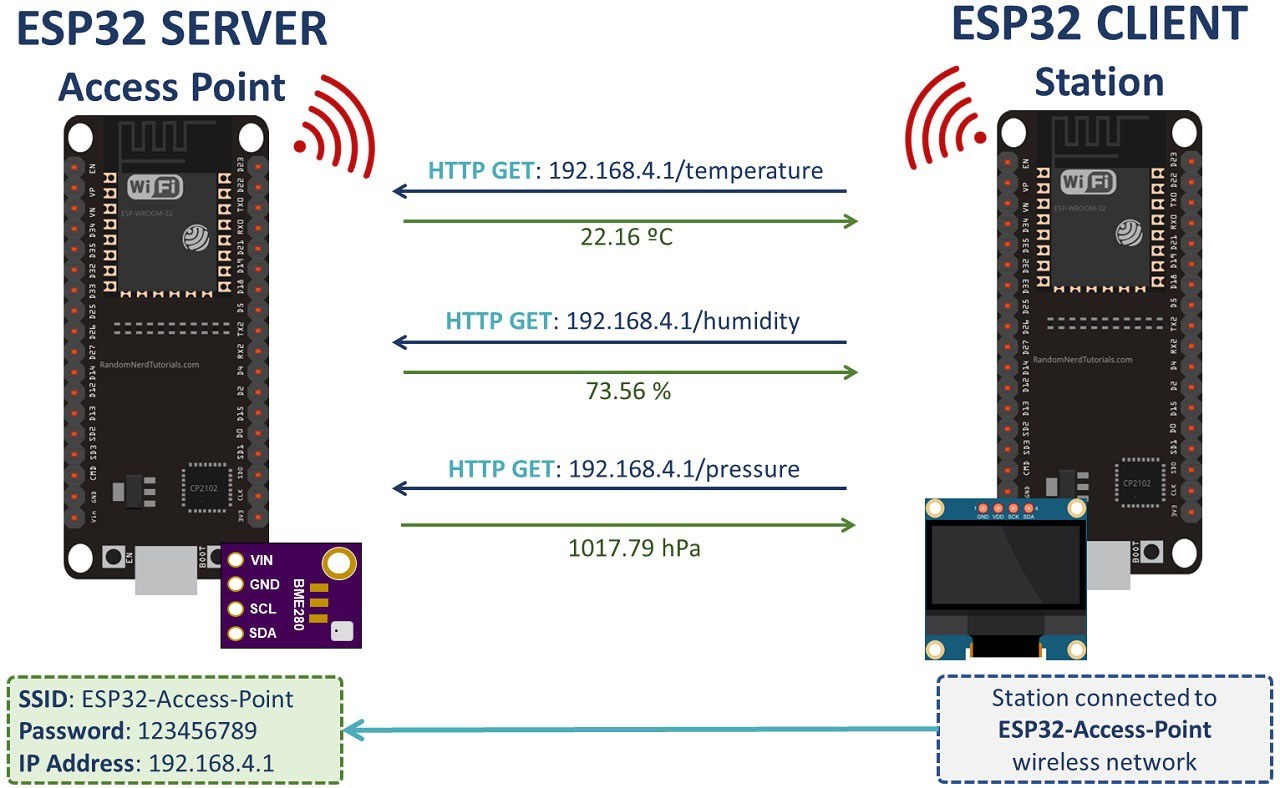
- ESP32服务器创建自己的无线网络(ESP32 Soft-Access Point)。因此,其他Wi-Fi设备可以连接到该网络(SSID: ESP32-Access-Point,密码: 123456789)。
- ESP32客户端设置为站。因此,它可以连接到ESP32服务器无线网络。
- 客户端可以向服务器发出HTTP GET请求,以请求传感器数据或任何其他信息。它只需要使用服务器的IP地址就可以在特定路由上发出请求:/temperature, /humidity 或者 /pressure。
- 服务器侦听传入的请求,并使用读数发送适当的响应。
- 客户端接收读数并将其显示在OLED显示屏上。
例如,ESP32客户端通过在服务器IP地址上进行请求,然后再在服务器上请求温度,湿度和压力给服务器/temperature, /humidity 和 /pressure, 分别。
ESP32服务器正在侦听这些路由,并在发出请求时通过HTTP响应发送相应的传感器读数。
所需材料
- 2个ESP32开发板
- BME280传感器
- I2C SSD1306 OLED显示屏
- 面包板*2
- 连接线
- 安装好esp32环境的Aruino IDE 或者使用在线编译环境:https://notes.qutaojiao.com
安装库
对于本教程,您需要安装以下库:
异步Web服务器库
我们将使用以下库来处理HTTP请求:
这些库无法通过库管理器安装。因此,您需要解压缩库并将其移动到Arduino IDE安装库文件夹。
或者,您可以转到 “草图” >“ 包含库” >“ 添加.ZIP库…”, 然后选择刚下载的库。
BME280库
可以通过Arduino Library Manager安装以下库。转到 草图 > 包括库> 管理库, 然后搜索库名称。
I2C SSD1306 OLED库
要与OLED显示器连接,您需要以下库。这些可以通过Arduino Library Manager安装。转到草图>包括库>管理库,然后搜索库名称。
#1 ESP32服务器(接入点)
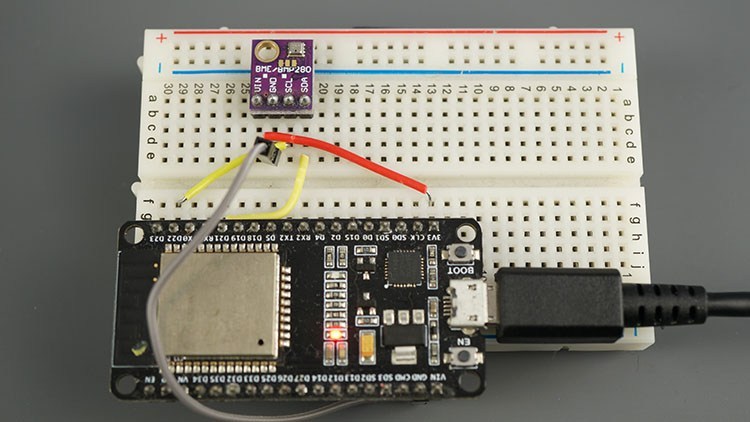
ESP32服务器是一个接入点(AP),用于侦听服务器上的请求。/temperature, /humidity 和 /pressure网址。当收到对这些URL的请求时,它将发送最新的BME280传感器读数。
出于演示目的,我们使用的是BME280传感器,但是您可以通过修改几行代码来使用任何其他传感器。
原理图,示意图
如下图所示,将ESP32连线至BME280传感器:

| BME280 | ESP32 |
| VIN / VCC | 3.3伏 |
| 地线 | 地线 |
| SCL | GPIO 22 |
| SDA | GPIO 21 |
##1 ESP32服务器的Arduino程序
// Import required libraries
#include <WiFi.h>
#include <ESPAsyncWebServer.h>

#include <Wire.h>
#include <Adafruit_Sensor.h>
#include <Adafruit_BME280.h>

// Set your access point network credentials
const char* ssid = "ESP32-Access-Point";
const char* password = "123456789";

/*#include <SPI.h>
#define BME_SCK 18
#define BME_MISO 19
#define BME_MOSI 23
#define BME_CS 5*/

Adafruit_BME280 bme; // I2C
//Adafruit_BME280 bme(BME_CS); // hardware SPI
//Adafruit_BME280 bme(BME_CS, BME_MOSI, BME_MISO, BME_SCK); // software SPI

// Create AsyncWebServer object on port 80
AsyncWebServer server(80);

String readTemp() {
  return String(bme.readTemperature());
  //return String(1.8 * bme.readTemperature() + 32);
}

String readHumi() {
  return String(bme.readHumidity());
}

String readPres() {
  return String(bme.readPressure() / 100.0F);
}

void setup(){
  // Serial port for debugging purposes
  Serial.begin(115200);
  Serial.println();

  // Setting the ESP as an access point
  Serial.print("Setting AP (Access Point)…");
  // Remove the password parameter, if you want the AP (Access Point) to be open
  WiFi.softAP(ssid, password);

  IPAddress IP = WiFi.softAPIP();
  Serial.print("AP IP address: ");
  Serial.println(IP);

  server.on("/temperature", HTTP_GET, [](AsyncWebServerRequest *request){
    request->send_P(200, "text/plain", readTemp().c_str());
  });
  server.on("/humidity", HTTP_GET, [](AsyncWebServerRequest *request){
    request->send_P(200, "text/plain", readHumi().c_str());
  });
  server.on("/pressure", HTTP_GET, [](AsyncWebServerRequest *request){
    request->send_P(200, "text/plain", readPres().c_str());
  });

  bool status;

  // default settings
  // (you can also pass in a Wire library object like &Wire2)
  status = bme.begin(0x76);
  if (!status) {
    Serial.println("Could not find a valid BME280 sensor, check wiring!");
    while (1);
  }

  // Start server
  server.begin();
}

void loop(){

}
代码如何工作
首先包括必要的库。包括 WiFi.h 图书馆和 ESPAsyncWebServer.h 库来处理传入的HTTP请求:
#include "WiFi.h"
#include "ESPAsyncWebServer.h"
包括以下库以与BME280传感器接口:
#include <Wire.h>
#include <Adafruit_Sensor.h>
#include <Adafruit_BME280.h>
在以下变量中,定义您的接入点网络凭据:
const char* ssid = "ESP32-Access-Point";
const char* password = "123456789";
我们将SSID设置为 ESP32-Access-Point,但您可以使用其他任何名称。您也可以更改密码。默认情况下,将其设置为123456789。
名为BME280的传感器创建一个实例:
Adafruit_BME280 bme;在端口80上创建一个异步Web服务器:
AsyncWebServer server(80);然后,创建三个函数,这些函数以String变量的形式返回温度,湿度和压力:
String readTemp() {
  return String(bme.readTemperature());
  //return String(1.8 * bme.readTemperature() + 32);
}

String readHumi() {
  return String(bme.readHumidity());
}

String readPres() {
  return String(bme.readPressure() / 100.0F);
}在里面setup(),需要设置波特率以初始化串行监视器:
Serial.begin(115200);使用前面定义的SSID名称和密码将ESP32设置为访问连接热点:
WiFi.softAP(ssid, password);然后,处理ESP32侦听传入请求的路由。
例如,当ESP32服务器收到请求时, /temperature URL,它发送由 readTemp() 用作字符(这就是为什么我们使用 c_str() 方法。
server.on("/temperature", HTTP_GET, [](AsyncWebServerRequest *request){
  request->send_P(200, "text/plain", readTemp().c_str());
});ESP中/humidity 和 /pressure URL:
server.on("/humidity", HTTP_GET, [](AsyncWebServerRequest *request){
  request->send_P(200, "text/plain", readHumi().c_str());
});
server.on("/pressure", HTTP_GET, [](AsyncWebServerRequest *request){
  request->send_P(200, "text/plain", readPres().c_str());
});
以下几行初始化BME280传感器:
bool status;

// default settings
// (you can also pass in a Wire library object like &Wire2)
status = bme.begin(0x76);
if (!status) {
  Serial.println("Could not find a valid BME280 sensor, check wiring!");
  while (1);
}
最后,启动服务器:
server.begin();由于这是异步Web服务器,因此loop()中不需要写东西:
void loop(){

}
测试ESP32服务器
将代码上传到板上,然后打开串行监视器。您应该获得如下信息:
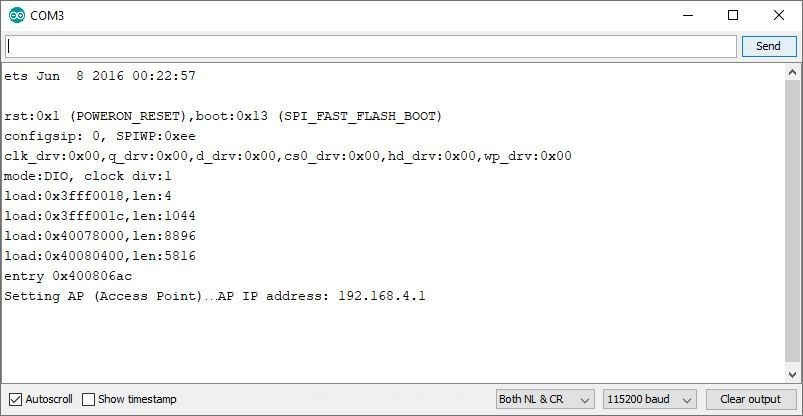
这意味着接入点已成功设置。
现在,要确保它正在侦听温度,湿度和压力请求,您需要连接到它的网络。
在您的智能手机中,转到Wi-Fi设置并连接到ESP32-Access-Point。密码是123456789:
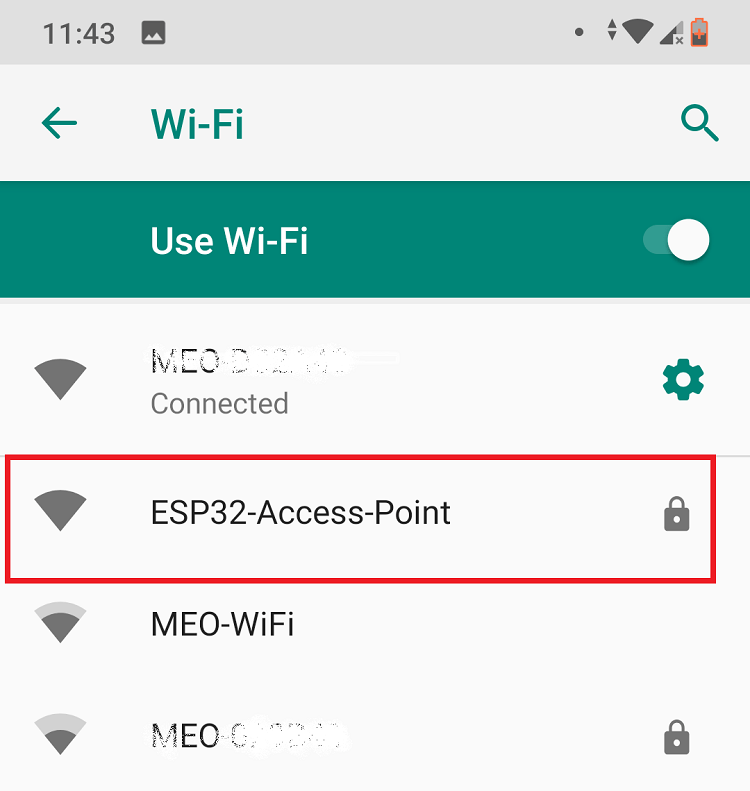
连接到接入点后,打开浏览器并输入 192.168.4.1/temperature
您应该在浏览器中获取温度值:
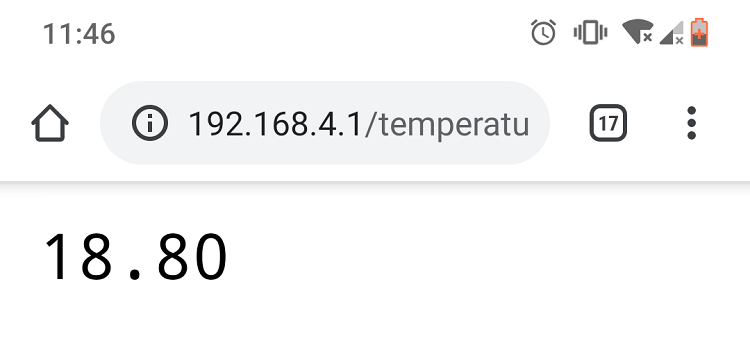
尝试使用此URL路径获取湿度 192.168.4.1/humidity
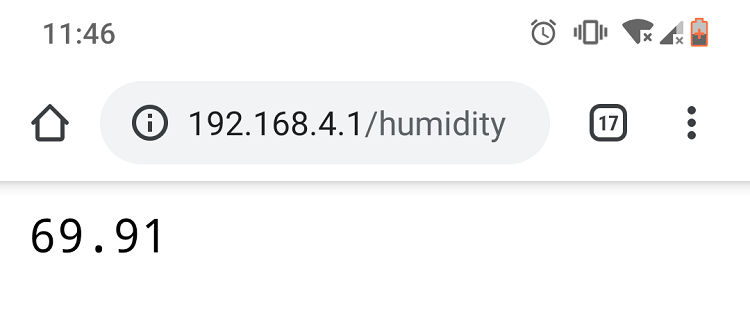
最后,前往 192.168.4.1/pressure 网址:
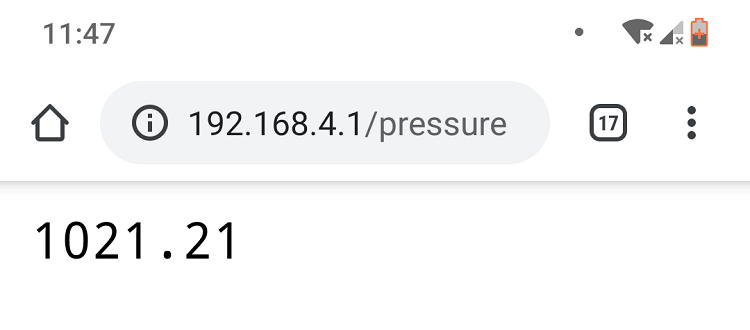
如果获得有效的读数,则表示一切正常。现在,您需要准备另一个ESP32开发板(客户端)来为您提出这些请求,并将其显示在OLED显示屏上。
#2 ESP32客户端(Station)
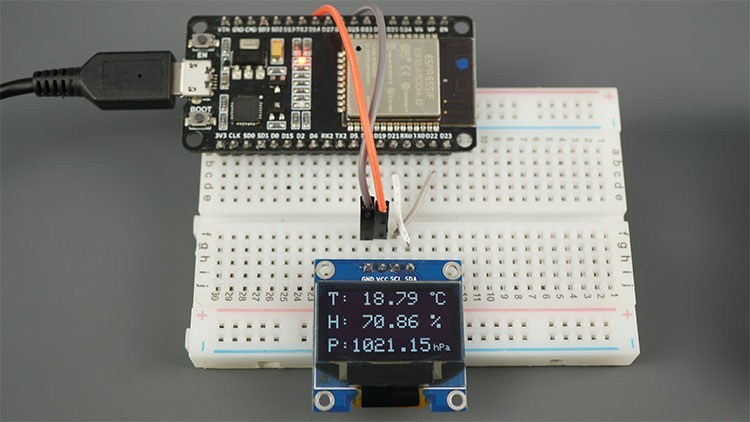
ESP32客户端是连接到ESP32服务器的Wi-Fi站。客户端通过在服务器上发出HTTP GET请求,从服务器请求温度,湿度和压力。/temperature, /humidity, 和 /pressureURL路由。然后,它将读数显示在OLED显示屏上。
原理图,示意图
如下图所示,将ESP32连线至OLED显示器:
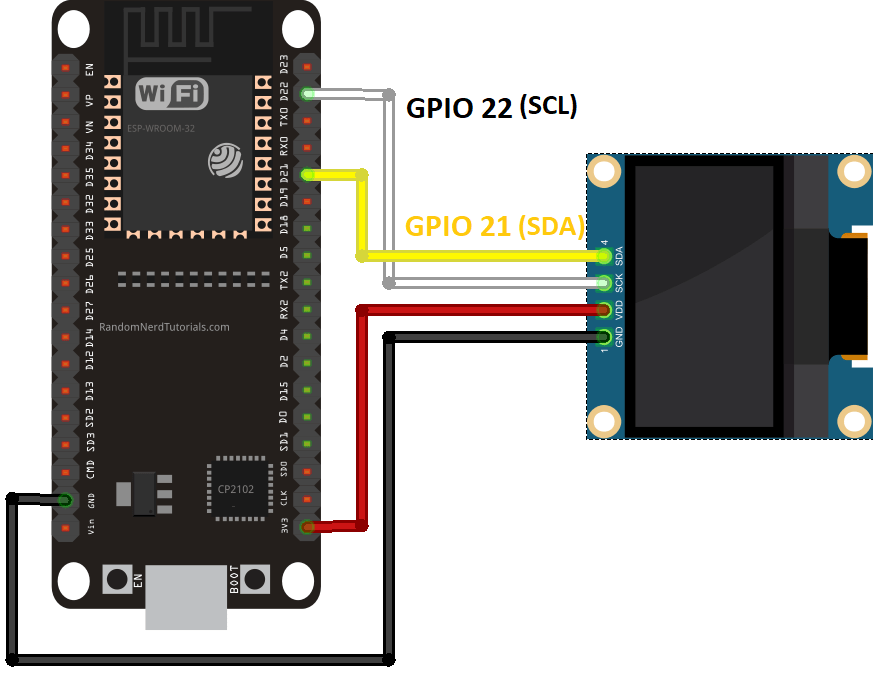
| 有机发光二极管 | ESP32 |
| VIN / VCC | VIN |
| GND | GND |
| SCL | GPIO 22 |
| SDA | GPIO 21 |
#2 ESP32客户端的Arduino程序
#include <WiFi.h>
#include <HTTPClient.h>

const char* ssid = "ESP32-Access-Point";
const char* password = "123456789";

//Your IP address or domain name with URL path
const char* serverNameTemp = "http://192.168.4.1/temperature";
const char* serverNameHumi = "http://192.168.4.1/humidity";
const char* serverNamePres = "http://192.168.4.1/pressure";

#include <Wire.h>
#include <Adafruit_GFX.h>
#include <Adafruit_SSD1306.h>

#define SCREEN_WIDTH 128 // OLED display width, in pixels
#define SCREEN_HEIGHT 64 // OLED display height, in pixels

// Declaration for an SSD1306 display connected to I2C (SDA, SCL pins)
#define OLED_RESET     4 // Reset pin # (or -1 if sharing Arduino reset pin)
Adafruit_SSD1306 display(SCREEN_WIDTH, SCREEN_HEIGHT, &Wire, OLED_RESET);

String temperature;
String humidity;
String pressure;

unsigned long previousMillis = 0;
const long interval = 5000;

void setup() {
  Serial.begin(115200);

  // Address 0x3C for 128x64, you might need to change this value (use an I2C scanner)
  if(!display.begin(SSD1306_SWITCHCAPVCC, 0x3C)) {
    Serial.println(F("SSD1306 allocation failed"));
    for(;;); // Don't proceed, loop forever
  }
  display.clearDisplay();
  display.setTextColor(WHITE);

  WiFi.begin(ssid, password);
  Serial.println("Connecting");
  while(WiFi.status() != WL_CONNECTED) {
    delay(500);
    Serial.print(".");
  }
  Serial.println("");
  Serial.print("Connected to WiFi network with IP Address: ");
  Serial.println(WiFi.localIP());
}

void loop() {
  unsigned long currentMillis = millis();

  if(currentMillis - previousMillis >= interval) {
     // Check WiFi connection status
    if(WiFi.status()== WL_CONNECTED ){
      temperature = httpGETRequest(serverNameTemp);
      humidity = httpGETRequest(serverNameHumi);
      pressure = httpGETRequest(serverNamePres);
      Serial.println("Temperature: " + temperature + " *C - Humidity: " + humidity + " % - Pressure: " + pressure + " hPa");

      display.clearDisplay();

      // display temperature
      display.setTextSize(2);
      display.setTextColor(WHITE);
      display.setCursor(0,0);
      display.print("T: ");
      display.print(temperature);
      display.print(" ");
      display.setTextSize(1);
      display.cp437(true);
      display.write(248);
      display.setTextSize(2);
      display.print("C");

      // display humidity
      display.setTextSize(2);
      display.setCursor(0, 25);
      display.print("H: ");
      display.print(humidity);
      display.print(" %");

      // display pressure
      display.setTextSize(2);
      display.setCursor(0, 50);
      display.print("P:");
      display.print(pressure);
      display.setTextSize(1);
      display.setCursor(110, 56);
      display.print("hPa");

      display.display();

      // save the last HTTP GET Request
      previousMillis = currentMillis;
    }
    else {
      Serial.println("WiFi Disconnected");
    }
  }
}

String httpGETRequest(const char* serverName) {
  HTTPClient http;

  // Your IP address with path or Domain name with URL path
  http.begin(serverName);

  // Send HTTP POST request
  int httpResponseCode = http.GET();

  String payload = "--";

  if (httpResponseCode>0) {
    Serial.print("HTTP Response code: ");
    Serial.println(httpResponseCode);
    payload = http.getString();
  }
  else {
    Serial.print("Error code: ");
    Serial.println(httpResponseCode);
  }
  // Free resources
  http.end();

  return payload;
}
代码如何工作
引入用于Wi-Fi连接和发出HTTP请求所需的库:
#include <WiFi.h>
#include <HTTPClient.h>
插入ESP32服务器网络连接信息。如果您已更改ESP32服务器中的默认网络凭据,则应在此处进行更改以匹配:
const char* ssid = "ESP32-Access-Point";
const char* password = "123456789";
然后,保存客户端将在其中发出HTTP请求的URL。ESP32服务器具有192.168.4.1 IP地址,我们需要设置/temperature, /humidity, 和 /pressure 网址:
const char* serverNameTemp = "http://192.168.4.1/temperature";
const char* serverNameHumi = "http://192.168.4.1/humidity";
const char* serverNamePres = "http://192.168.4.1/pressure";
包括与OLED显示器接口的库:
#include <SPI.h>
#include <Wire.h>
#include <Adafruit_GFX.h>
#include <Adafruit_SSD1306.h>
设置OLED显示尺寸:
#define SCREEN_WIDTH 128 // OLED display width, in pixels
#define SCREEN_HEIGHT 64 // OLED display height, in pixels
创建一个 display 具有您之前定义的大小并具有I2C通信协议的对象:
Adafruit_SSD1306 display(SCREEN_WIDTH, SCREEN_HEIGHT, &Wire, OLED_RESET);初始化将保存服务器检索的温度,湿度和压力读数的字符串变量:
String temperature;
String humidity;
String pressure;
设置每个请求之间的时间间隔。默认情况下,它设置为5秒,但是您可以将其更改为任何其他间隔:
const long interval = 5000; 在里面 setup(),初始化OLED显示:
// Address 0x3C for 128x64, you might need to change this value (use an I2C scanner)
if(!display.begin(SSD1306_SWITCHCAPVCC, 0x3C)) {
  Serial.println(F("SSD1306 allocation failed"));
  for(;;); // Don't proceed, loop forever
}
display.clearDisplay();
display.setTextColor(WHITE);注意:如果您的OLED显示器无法正常工作,请使用I2C扫描仪程序检查其I2C地址,并相应地更改代码。
将ESP32客户端连接到ESP32服务器网络:
WiFi.begin(ssid, password);
Serial.println("Connecting");
while(WiFi.status() != WL_CONNECTED) {
  delay(500);
  Serial.print(".");
}
Serial.println("");
Serial.print("Connected to WiFi network with IP Address: ");
在里面 loop() 是我们发出HTTP GET请求的地方。我们创建了一个名为httpGETRequest() 接受我们要发出请求的URL路径作为参数,参数类型为 String:
您可以在项目中使用next函数来简化代码:
String httpGETRequest(const char* serverName) {
  HTTPClient http;

  // Your IP address with path or Domain name with URL path
  http.begin(serverName);

  // Send HTTP POST request
  int httpResponseCode = http.GET();

  String payload = "--";

  if (httpResponseCode>0) {
    Serial.print("HTTP Response code: ");
    Serial.println(httpResponseCode);
    payload = http.getString();
  }
  else {
    Serial.print("Error code: ");
    Serial.println(httpResponseCode);
  }
  // Free resources
  http.end();

  return payload;
}
我们使用该功能从服务器获取温度,湿度和压力读数:
temperature = httpGETRequest(serverNameTemp);
humidity = httpGETRequest(serverNameHumi);
pressure = httpGETRequest(serverNamePres);
在串行监视器中打印这些读数以进行调试:
Serial.println("Temperature: " + temperature + " *C - Humidity: " + humidity + " % - Pressure: " + pressure + " hPa");然后,在OLED显示屏中显示温度:
display.setTextSize(2);
display.setTextColor(WHITE);
display.setCursor(0,0);
display.print("T: ");
display.print(temperature);
display.print(" ");
display.setTextSize(1);
display.cp437(true);
display.write(248);
display.setTextSize(2);
display.print("C");
湿度:
display.setTextSize(2);
display.setCursor(0, 25);
display.print("H: ");
display.print(humidity);
display.print(" %");
最后,压力读数:
display.setTextSize(2);
display.setCursor(0, 50);
display.print("P:");
display.print(pressure);
display.setTextSize(1);
display.setCursor(110, 56);
display.print("hPa");

display.display();我们使用计时器而不是延迟来每x秒发送一个请求。这就是为什么我们有previousMillis, currentMillis变量,并使用 millis()功能。
将程序上传到ESP32(客户端)以测试一切是否正常。
测试ESP32客户端
将两块板都重启后,您会看到ESP#2每隔5秒从ESP#1接收一次新的温度,湿度和压力读数。
这是您应该在ESP32客户端串行监视器上看到的内容:
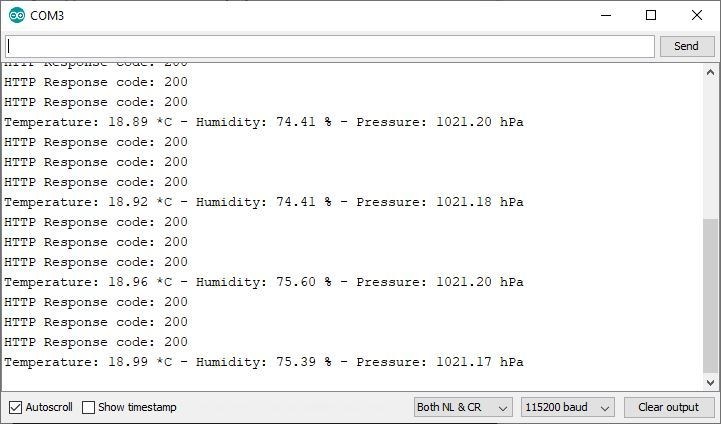
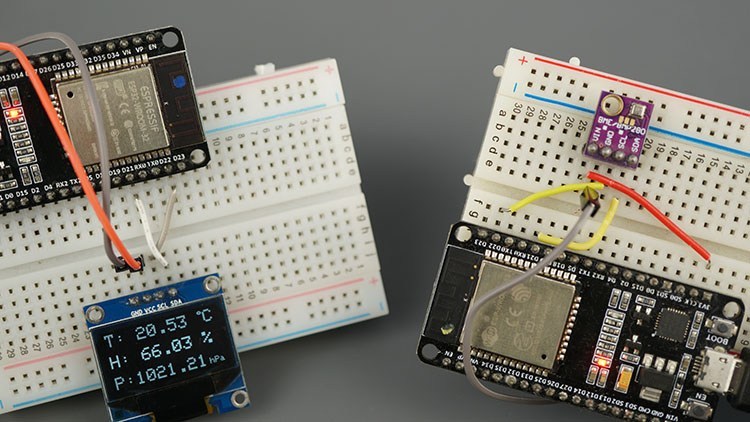
传感器读数也显示在OLED中:

两个开发板正在互相交换数据:
