建立一个由Arduino控制的厨房定时器,并学习如何将Arduino与LCD和按钮进行交互。
在本文中,我们将学习如何创建一个由Arduino控制的厨房定时器。该项目将帮助您管理所需的烘烤时间,并避免过度烹饪菜肴。
您可以方便地为烹饪设置时间限制,然后走开直到听到哔哔声响起。
硬件
- 1个 Arduino的
- 1个 液晶键盘防护罩
- 1个 蜂鸣器
- ###软件
- 1个 Arduino IDE
我们将为此项目使用带按键的Arduino LCD。我们从连接小型蜂鸣器开始,该蜂鸣器将使设备启动并运行,时间不会超过几分钟。分别通过其按钮界面和LCD来实现屏蔽的输入和输出功能。
请注意,您可以将该项目中的模块和代码改编为需要用户界面的其他任何实验。对于此特定版本,我们将遵循下面列出的流程。
厨房定时器用户界面流程
- 开机后,设备将显示“ Arduino Kitchen Timer”消息3秒钟。
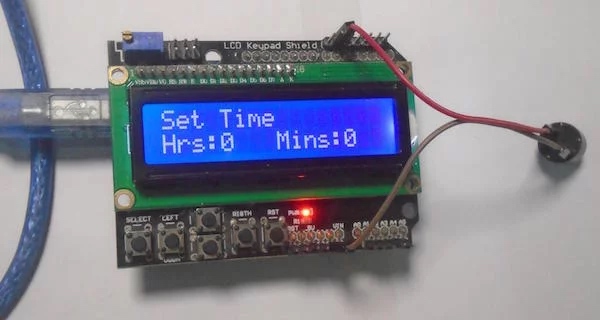
- 然后计时器将提示您设置时间。您可以通过按左右键将光标移动到分钟和小时。
- 您可以使用向上和向下箭头键调整分钟和小时设置。
- 设置所需的时间后,按选择按钮,计时器将启动。
- 如果要再次设置时间,请再次按选择按钮。
- 时间结束后,蜂鸣器将发出蜂鸣声。
- 要停止蜂鸣器,请按键盘防护板上的重置按钮。
厨房定时器所需的组件
Arduino的
液晶键盘防护罩
蜂鸣器
厨房定时器电路图


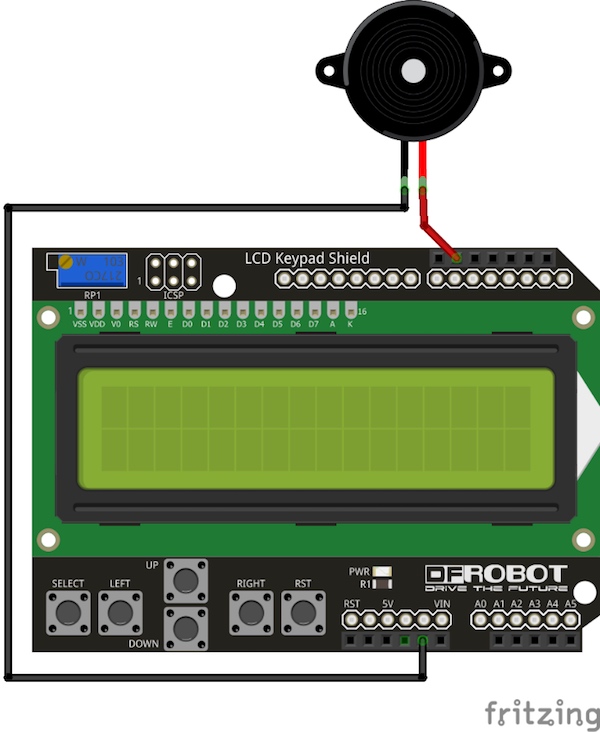
首先,将LCD对准并直接插在Arduino上。然后将蜂鸣器的正极连接到Arduino的引脚12,并将蜂鸣器的负极连接到地面。
Arduino厨房计时器项目代码
// select the pins used for the LCD keypad
LiquidCrystal lcd(8, 9, 4, 5, 6, 7);
// define some variables
int lcd_key     = 0;
int adc_key_in  = 0;
int hrs = 0;
int mins = 0;
int set_mins = 0;
int set_hrs = 1;
int secs = 60;
int cursor_pos = 1;
int buzzer_pin = 12;

bool startTimer = false;
bool setTimer = true;
bool get_time = false;

unsigned long interval=1000; // the time we need to wait
unsigned long previousMillis=0; // millis() returns an unsigned long.
// Defining button used by the lcd keypad
#define btnRIGHT  0
#define btnUP     1
#define btnDOWN   2
#define btnLEFT   3
#define btnSELECT 4
#define btnNONE   5

// read the buttons
int read_LCD_buttons()
{
 adc_key_in = analogRead(0);      // reading the button value from the lcd keypad
 // checking which button is pressed
 if (adc_key_in > 1000) return btnNONE; // We make this the 1st option for speed reasons since it will be the most likely result
 if (adc_key_in < 50)   return btnRIGHT;
 if (adc_key_in < 250)  return btnUP;
 if (adc_key_in < 450)  return btnDOWN;
 if (adc_key_in < 650)  return btnLEFT;
 if (adc_key_in < 850)  return btnSELECT;

 return btnNONE;  // when all others fail, return this...
}

void setup()
{
 Serial.begin(115200);
 pinMode(buzzer_pin, OUTPUT);

 lcd.begin(16, 2);              // start communication with LCD keypad shield
 lcd.setCursor(0,0);
 lcd.print("Arduino Kitchen");
 lcd.setCursor(0, 1);
 lcd.print("    Timer");
 delay(3000);
}


// This function will count the time and will beep the buzzer when the time will be up.
void start_timer(){
  // Checking whether time is up or not
  if(hrs == 0 && mins == 0 && secs == 0){
    lcd.setCursor(0, 0);
    lcd.print(" Time is UP");
    lcd.setCursor(0, 1);
    lcd.print("  Beep Beep");
    digitalWrite(buzzer_pin, HIGH);
    delay(500);
    digitalWrite(buzzer_pin, LOW);
    delay(500);
  }

  else if(secs < 0){
    secs = 59;
    mins = mins - 1;
  }

  else if(mins < 0){
    mins = 59;
    hrs = hrs - 1;
  }

  else
  {
  get_time = true;
  counter();

  lcd.setCursor(0, 0);
  lcd.print("Timer is ON");

  lcd.setCursor(0, 1);
  lcd.print(hrs);
  lcd.print(":");

  lcd.setCursor(4, 1);
  lcd.print(mins);
  lcd.print(":");

  lcd.setCursor(8, 1);
  lcd.print(secs);
  }

  lcd_key = read_LCD_buttons();  // read the buttons

  switch (lcd_key)               // depending on which button was pushed, we perform an action
  {
    // if select button is pressed, move back to set time
   case btnSELECT:
     {
      startTimer = false;
      setTimer = true;
      delay(300);
      lcd.clear();
     break;
     }
   case btnNONE:
     {
     break;
     }
 }
}

// This function will set the time
void set_timer(){
  counter();
  lcd.setCursor(0, 0);
  lcd.print("Set Time");

  lcd.setCursor(0, 1);
  lcd.print("Hrs:");
  lcd.print(hrs);

  lcd.setCursor(8, 1);
  lcd.print("Mins:");
  lcd.print(mins);


 lcd.setCursor(0,1);
 lcd_key = read_LCD_buttons();  // read the buttons

 switch (lcd_key)               // depending on which button was pushed, we perform an action
 {
  // if right button is pressed, then move the cursor to minutes
   case btnRIGHT:
     {
      cursor_pos = set_mins;
     break;
     }
  // if left button is pressed, then move the cursor to hours
   case btnLEFT:
     {
      cursor_pos = set_hrs;
     break;
     }
  // if up button is pressed, add 1 to the minutes or hours
   case btnUP:
     {
      delay(300);
      if(cursor_pos == set_mins){
        mins++;
        if(mins > 59){
          mins = 0;
        }
      }
      else if(cursor_pos == set_hrs){
        hrs++;
        if(hrs > 24){
          hrs = 0;
        }
      }
     break;
     }
   // if down button is pressed, minus 1 from the minutes or hours
   case btnDOWN:
     {
      delay(300);
      if(cursor_pos == set_mins){
        mins--;
        if(mins < 0){
          mins = 60;
        }
      }
      else if(cursor_pos == set_hrs){
        hrs--;
        if(hrs < 0){
          hrs = 24;
        }
      }
     break;
     }
   // if select button is pressed, start the timer
   case btnSELECT:
     {
      startTimer = true;
      setTimer = false;
      mins = mins - 1;
      delay(300);
     break;
     }
   case btnNONE:
     {
     break;
     }
 }
}

void counter() {
 unsigned long currentMillis = millis(); // grab current time

 // check if "interval" time has passed (1000 milliseconds)
 if ((unsigned long)(currentMillis - previousMillis) >= interval) {

  lcd.clear();
  if(get_time == true){
   secs--;
   get_time = false;
  }
   previousMillis = millis();
 }
}
最后
创建厨房定时器仅仅是个开始!
您已经创建了自己的厨房计时器!该项目最好的部分是能够使该模块适应其他需要在LCD和按钮或蜂鸣器之间建立简单接口的项目的能力。您还可以为模块设计定制的3D打印外壳,并使其成为您自己的模块。


