
释放双眼,带上耳机,听听看~!
简介
你好,欢迎来到这个教程,在这里我将使用MLX90614(GY906)红外非接触式温度传感器,我将它采集到的数据显示到LCDi²c屏幕和OLED显示器上,显示格式分为摄氏度°C和和华氏度°F两种。
工作原理:每个物体根据其热量发射红外波,并且使用热电堆检测这些波,这些热电堆变得更热和更热,同时将多余的热量转换为电。
以下是有关MLX 90614传感器的一些信息:
- 环境温度范围:-40至125˚C(-40至257°F)
- 物体温度范围(非接触):-70至380˚C(-94至716°F)
- 分辨率:0.02°C
- 精度:环境温度和物体温度均为0.5°C(0-50°C)
您可以将此传感器用于医疗和保健应用,家庭自动化或使用非侵入性方法测量表面
步骤一 材料准备
硬件准备:
必选:MLX 90614传感器
arduino uno开发板
可选:oled显示屏 1602显示屏
软件准备:
arduino 集成开发环境;扩展库函数(见附件);串口软件(可用IDE自带,也可用自己习惯的软件)
步骤二 电路搭建
1.串口显示数据,不采用oled和lcd显示器
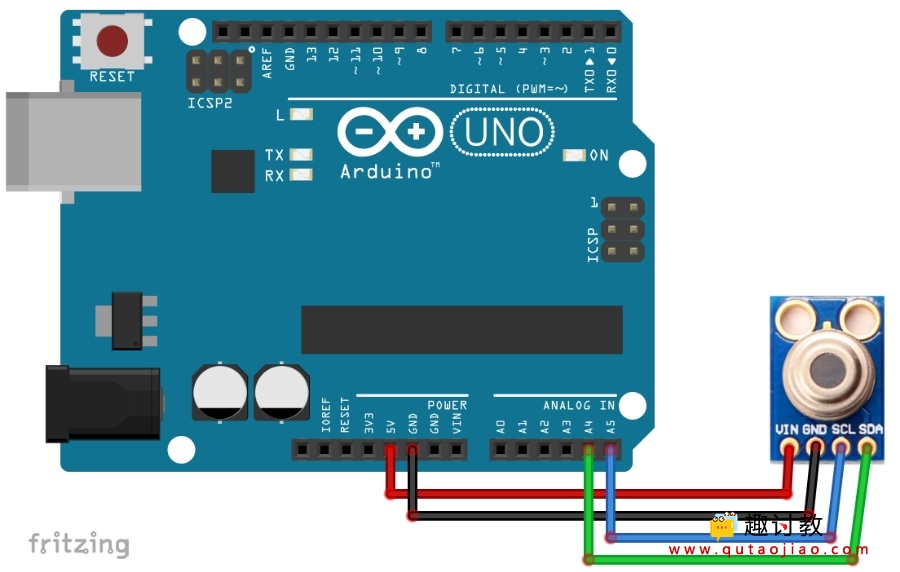
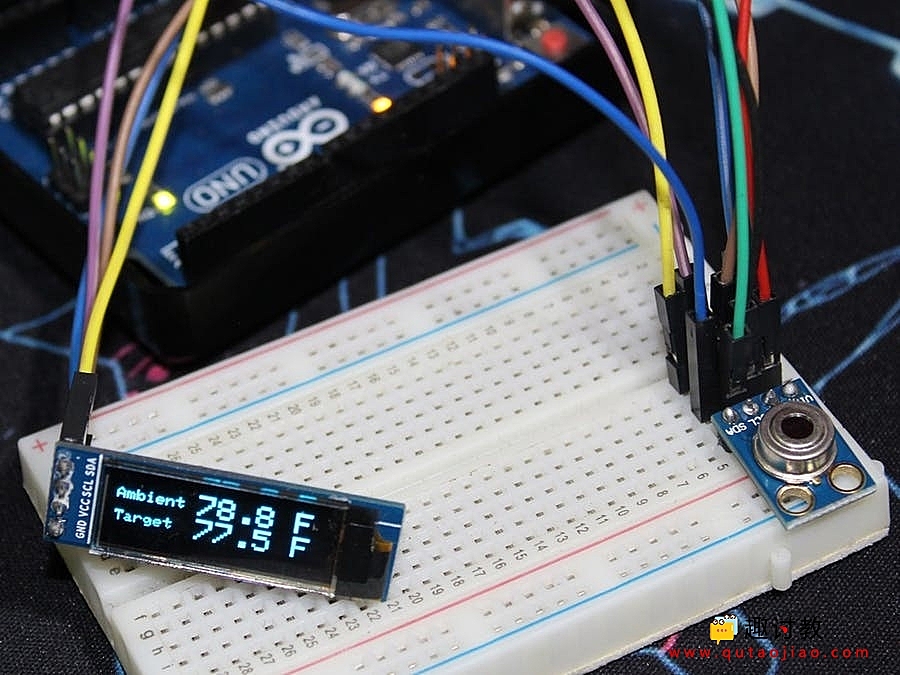
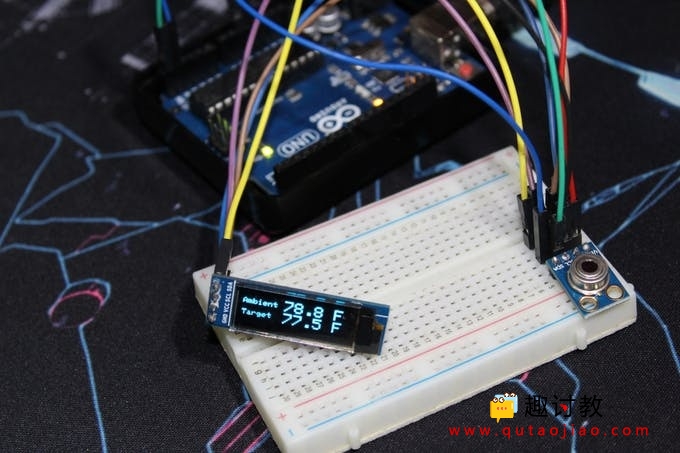
2.采用oled显示器显示连接图

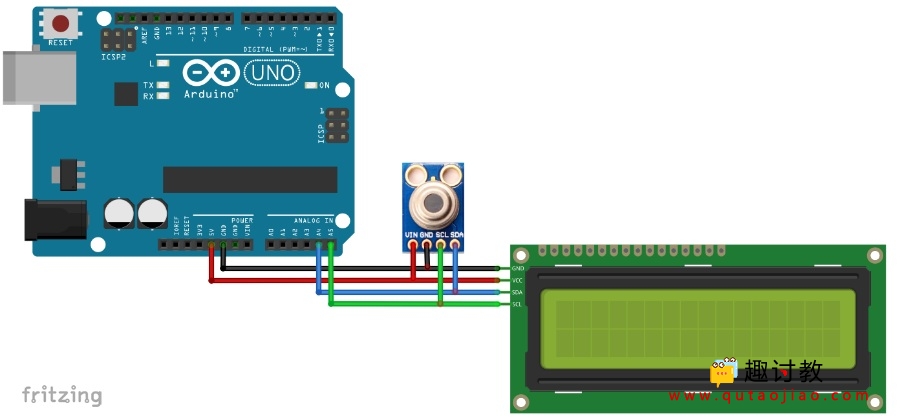
3:lcd显示器显示连接图
步骤三 编写程序
1.OLED显示MLX90614采集到的数据
MLX90614_OLED_Fahrenheit.ino Arduino
/* This code works with MLX90614 (GY906) and OLED screen
 * It measures both ambient and object temperature in Fahrenheit and display it on the screen
 */

#include
#include
#include
#include

#define SCREEN_WIDTH 128 // OLED display width, in pixels
#define SCREEN_HEIGHT 32 // OLED display height, in pixels
#define OLED_RESET    -1 // Reset pin # (or -1 if sharing Arduino reset pin)

Adafruit_SSD1306 display(SCREEN_WIDTH, SCREEN_HEIGHT, &Wire, OLED_RESET); //Declaring the display name (display)
Adafruit_MLX90614 mlx = Adafruit_MLX90614();

void setup() {
  mlx.begin();
  display.begin(SSD1306_SWITCHCAPVCC, 0x3C); //Start the OLED display
  display.clearDisplay();
  display.display();

}

void loop() {
  display.clearDisplay();

  display.setTextSize(1);
  display.setTextColor(WHITE);
  display.setCursor(0,4);
  display.println("Ambient");

  display.setTextSize(2);
  display.setCursor(50,0);
  display.println(mlx.readAmbientTempF(),1);

  display.setCursor(110,0);
  display.println("F");

  display.setTextSize(1);
  display.setTextColor(WHITE);
  display.setCursor(0,20);
  display.println("Target");

  display.setTextSize(2);
  display.setCursor(50,17);
  display.println(mlx.readObjectTempF(),1);

  display.setCursor(110,17);
  display.println("F");

  display.display();

  delay(1000);

}
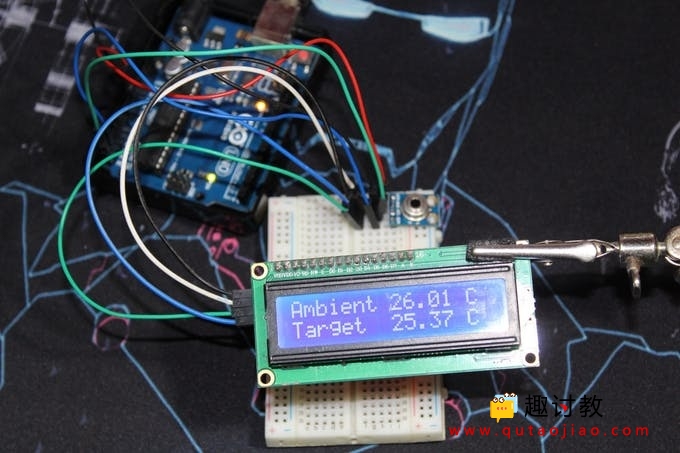
2.lcd显示MLX90614采集到的数据
MLX90614_LCD_Celsius.ino Arduino

/* This code works with MLX90614 (GY906) and LCD ic screen

 * It measures both ambient and object temperature in Celsius and display it on the screen

 */


#include

#include

#include


#define I2C_ADDR 0x27 //I2C adress, you should use the code to scan the adress first (0x27) here

#define BACKLIGHT_PIN 3 // Declaring LCD Pins

#define En_pin 2

#define Rw_pin 1

#define Rs_pin 0

#define D4_pin 4

#define D5_pin 5

#define D6_pin 6

#define D7_pin 7


LiquidCrystal_I2C lcd(I2C_ADDR,En_pin,Rw_pin,Rs_pin,D4_pin,D5_pin,D6_pin,D7_pin);

Adafruit_MLX90614 mlx = Adafruit_MLX90614();


void setup() {


  mlx.begin();

  lcd.begin (16,2);

  lcd.setBacklightPin(BACKLIGHT_PIN,POSITIVE);

  lcd.setBacklight(HIGH); //Lighting backlight

  lcd.home ();


}


void loop() {

 lcd.setCursor(0,0);

 lcd.print("Ambient ");

 lcd.print(mlx.readAmbientTempC());

 lcd.print(" C");


 lcd.setCursor(0,1);

 lcd.print("Target  ");

 lcd.print(mlx.readObjectTempC());

 lcd.print(" C");


 delay(1000);


}
步骤四 验证结果
串口显示:

oled显示华氏度wen
lcd显示摄氏度温度


非常好